Q: How to set up a 'Weekly Cycle' timer for automatic industrial ventilation and cooling systems?
Answer:
Industrial facilities, warehouses, greenhouses, and commercial kitchens require constant but structured airflow to regulate temperatures, manage humidity, and exhaust fumes. Running heavy-duty ventilation fans and cooling systems 24 hours a day, 7 days a week, is extremely inefficient. It leads to massive electricity bills, high wear and tear on fan bearings, and increased mechanical maintenance costs. Setting up an automatic Weekly Cycle Timer allows you to schedule ventilation exactly when it is needed, such as during active factory shifts, and scale down or disable cooling during non-working hours or weekends. A weekly cycle timer provides the flexibility to program different operational patterns for weekdays and weekends, and can cycle the systems on and off at regular intervals. This B2B guide covers the circuit design, electrical integration, step-by-step programming, and commissioning of a weekly ventilation timer using high-performance DAQCN digital time switches.
The Operational and Financial Benefits of Scheduled Ventilation
Automating your facility's ventilation and cooling systems using weekly timers delivers significant, measurable advantages:
Integrating the Timer into the Electrical Control Panel
Before programming the timer, it must be physically and electrically integrated into the ventilation control panel. Standard digital time switches are compact control-level devices and are not designed to directly carry the heavy electrical currents drawn by large three-phase ventilation fans.
To integrate the timer safely:
Step-by-Step Electrical Connection Procedure
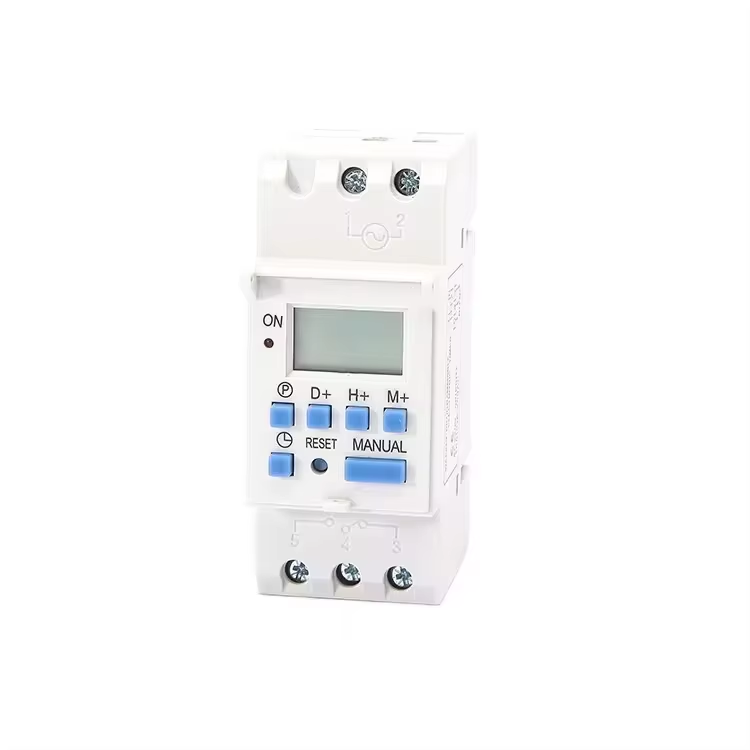
Follow these standard wiring steps to connect a DAQCN digital weekly timer (such as the KG316T series) to your ventilation control circuit:
1. Mount the Timer: Install the weekly timer onto the standard 35mm DIN rail inside the electrical control cabinet, alongside the fan contactors.
2. Connect Power Supply: Connect the AC control power supply to the timer's power input terminals. Ensure the voltage matches the timer's rated operating voltage.
3. Wire the Control Output: Connect the control power line to the common terminal (COM) of the timer's output relay. Run a wire from the normally open (NO) terminal of the timer's relay to the coil terminal (A1) of the magnetic contactor.
4. Wire the Motor Power: Connect the three-phase power lines through a circuit breaker, then through the main contacts of the contactor, through the thermal overload relay, and finally to the ventilation fan motor.
Configuring and Programming the Weekly Cycle Timer
Once the electrical wiring is complete, you must program the schedule into the DAQCN digital weekly timer. Let us configure a typical industrial weekly schedule as an example:
Follow these programming steps:
1. Set current Time and Day: Press and hold the Clock button, then use the Hour, Min, and Week buttons to set the current real-time clock and the current day on the screen.
2. Program Stage 1 (Daily Shift Start): Press the Timer button once. The screen will display '1 ON'. Use the Week button to select the active days (Monday-to-Friday). Use the Hour and Min buttons to set the start time to 07:30.
3. Program Stage 1 Stop: Press the Timer button again to program the turn-off event. The screen will display '1 OFF'. Set the stop time to 18:00.
4. Program Stage 2 (Nighttime Cycling): Press the Timer button to go to '2 ON'. Set the days to Monday-to-Friday and set the start time to 22:00. Press the Timer button to go to '2 OFF', and set the stop time to 22:10. Repeat this process for subsequent nighttime intervals using the remaining program channels.
5. Battery Backup: High-quality DAQCN digital timers feature a built-in lithium battery backup. If the main power is switched off during weekends, the battery backup keeps the clock running and retains all programmed schedules for up to three years.
Why Select DAQCN Weekly Timers?
DAQCN is a trusted global manufacturer of industrial time switches and automation controls. Our digital weekly timers are built using high-grade, flame-retardant housings, high-current internal relays, and long-life lithium battery reserves. They are certified to meet international CE and safety standards, ensuring reliable performance in harsh, hot, and dusty factory environments.
Conclusion
Setting up a weekly cycle timer is one of the most effective, low-cost upgrades you can make to optimize industrial ventilation and cooling systems. By aligning fan operations with active factory shifts and utilizing cyclic run-times overnight, facility managers can significantly reduce energy bills, extend motor life, and maintain ideal workplace conditions. Choose DAQCN's high-reliability digital timers to guarantee long-term maintenance-free scheduling. Contact DAQCN today to explore our full catalog of industrial digital timers and receive expert application engineering support.
Discover DAQUAN’s CE/TUV-certified relays, timers, energy meters & WiFi smart switches for industrial automation. ISO9001 factory in Wenzhou, 30 km to airport, global OEM/ODM.
No. 172, Xinguang Avenue, Xinguang Industrial Zone, Liushi Town
Copyright © 2026 WENZHOU DAQUAN ELECTRIC CO.,LTD All rights reserved. Privacy Policy

 Hot News